Installing Universal Bedlegs
Bedleg and Bracket Installation Instructions
The Universal Bedleg® System easily attaches to the box spring utilizing two components: the threaded base plate and the bed leg. The threaded base plate installs directly onto the box spring and the leg simply screws into the threaded area of the base plate completing the installation. Once the base plate is secured to the box spring using a power screwdriver, you can easily resize the height of the beds without any tools by simply attaching a different size leg

IMPORTANT: Verify that your side rails meet the minimum requirements of a width of no less than 1″x3″ (actual size 3/4″ x 2 1/4″).

Before drilling, pick the set of screw holes you will use by measuring the width of your boxspring rail. If your rails are 1″ x 4″ (actual width of 3/4″ x 3 1/4″), use the outside holes [C]. The side with the single set of holes [A] always faces the outside edge of the bedframe.
If your rails are less than an actual width of 3/4″ x 3 1/4″, use the inside set of screw holes [B].
Always use the outside screw holes [A].

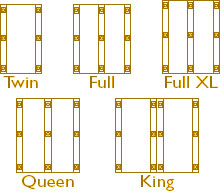
Using the above diagram, determine the number and placement of the Bedlegs for your bed size

Using a power screwdriver, mount the plate to the boxspring using the supplied hardware. Use only 4 screws per plate.

Hand twist the threaded leg stem into the base plate.

Universal Bedlegs headboard brackets easily attach to most headboards.
Using a power screwdriver, install the headboard bracket with the supplied hardware directly to the boxspring. Use only 4 screws per plate

Complete installation, simply bolt the headboard onto the bracket.
Bolts are not provided to attach the headboard bracket to the headboard.


